Understanding lighting is key to transforming an ordinary shot into a cinematic masterpiece. It sets the mood, adds depth, and guides the audience’s focus. This guide provides a complete overview of essential lighting techniques, from the foundational key light to nuanced methods like motivated lighting, explaining what they are and how to use them effectively.
Key Light – The Primary Source
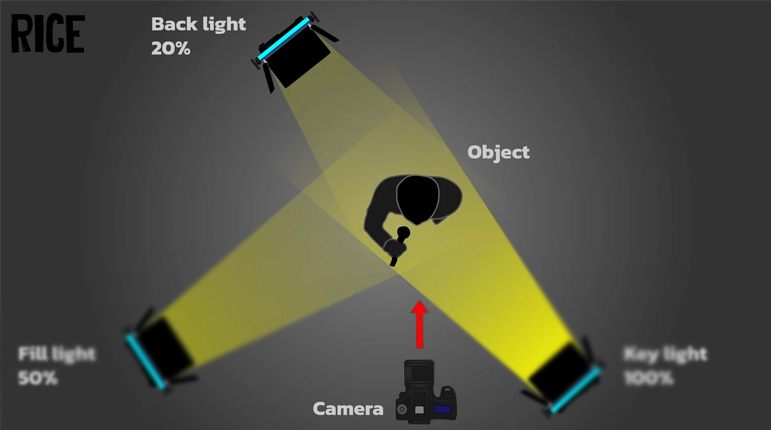
The key light is the main and strongest light source in a scene. It is the primary illuminator of the subject, establishing the overall exposure and creating the dominant shadows.
Role: The key light’s primary role is to define the form and dimension of the subject. Its placement and intensity dictate the mood and style of the shot. A high-key setup (bright, with few shadows) can create a cheerful and optimistic atmosphere, while a low-key setup (dark, with high contrast) often evokes drama, mystery, or suspense.
When to Use: A key light is the foundation of almost every lighting setup, especially in narrative filmmaking. It’s the first light you should position. Whether you’re shooting a simple interview or a complex dramatic scene, the key light is essential for shaping your subject and setting the scene’s tone.

Fill Light – Softening the Shadows
The fill light is a secondary light source that is positioned to “fill in” the shadows created by the key light. It is typically softer and less intense than the key light.
Role: The purpose of the fill light is to control the contrast of the scene. By brightening the dark shadows, it reveals more detail in the darker areas of the frame. The ratio between the key and fill light determines the scene’s contrast. A high key-to-fill ratio results in a high-contrast, dramatic look, while a low ratio creates a more even, flatter look.
When to Use: Use a fill light whenever the shadows cast by the key light are too harsh or deep for the desired mood. It’s crucial in interviews, beauty shots, and commercial work where you want the subject to appear friendly and well-defined. In horror or noir films, you might use very little or no fill light to maintain a sense of mystery and tension.

Backlight – Creating Separation and Depth
A backlight, also known as a rim light or hair light, is placed behind the subject, pointing towards the camera.
Role: Its function is to separate the subject from the background. By creating a bright outline or “rim” of light around the subject’s hair and shoulders, the backlight adds depth to the image and prevents the subject from blending into the background. This technique makes the shot feel more three-dimensional.
When to Use: Backlighting is invaluable for creating a professional, polished look. It’s especially effective in interviews and narrative scenes to make your characters “pop.” It can also be used for dramatic effect, such as creating a silhouette when the backlight is much stronger than the key light.
Side Light – Adding Drama and Texture
A side light is positioned to the side of the subject, often at a 90-degree angle.
Role: This technique is excellent for revealing texture and creating a sense of drama. By illuminating only one side of the subject, it produces long shadows and high contrast, often associated with a “chiaroscuro” effect. It can make a character appear mysterious, conflicted, or dangerous.
When to Use: Use side lighting when you want to emphasize texture, such as the wrinkles on a character’s face or the grain of a wooden surface. It’s a popular choice for film noir, thrillers, and dramatic scenes that require a moody and high-contrast aesthetic.

Practical Light – Lighting from Within the Scene
Practical lights are actual working light sources that are visible within the frame. This includes lamps, candles, television screens, car headlights, or any other light that is part of the scene’s environment.
Role: Practicals enhance realism and authenticity. They serve as a plausible light source within the scene, making the overall lighting setup feel more natural and motivated. They can also contribute to the mood and atmosphere of the setting.
When to Use: Incorporate practical lights to ground your scene in reality. A desk lamp in an office, a bedside lamp in a bedroom, or neon signs on a city street all add to the believability of your world. They are often used as the primary key or fill light in a scene to sell the effect of natural illumination.

Bounce – Reflecting for a Softer Touch
Bounce lighting isn’t a light source itself, but a technique. It involves pointing a light at a reflective surface—like a white wall, ceiling, or a dedicated bounce card (reflector)—and using the reflected light to illuminate the subject.
Role: The primary role of bounce lighting is to create a large, soft light source. The reflected light is diffused and scattered, resulting in soft, flattering illumination with minimal shadows.
When to Use: This is a go-to technique when you need soft, natural-looking light but don’t have a large softbox. It’s perfect for filling a room with ambient light, simulating daylight coming through a window, or creating a gentle fill for portraits and interviews.

Soft Light vs. Hard Light
Soft Light – Flattering and Gentle
Soft light comes from a large source (either physically large, like a softbox, or bounced off a large surface). The light wraps around the subject, creating soft, gradual shadows with smooth transitions.
Role: Soft light is generally flattering for subjects as it minimizes skin texture and wrinkles. It creates a gentle, clean, and often beautiful atmosphere.
When to Use: Use soft light for beauty shots, interviews, romantic scenes, and comedies. It’s the standard for commercial and corporate video work where the goal is to make the subject look their best.
Hard Light – Dramatic and Intense
Hard light comes from a small, direct source, like the sun on a clear day or a spotlight. It creates sharp, well-defined shadows and high contrast.
Role: Hard light creates a sense of drama, tension, and intensity. It can be used to reveal texture and create a gritty, edgy, or powerful look.
When to Use: This type of light is perfect for film noir, thrillers, action sequences, or any scene where you want to create a strong, dramatic mood. It can make a character look strong, menacing, or vulnerable depending on its direction and intensity.

Motivated Lighting – Justified Illumination
Motivated lighting is a technique where the lighting setup is designed to imitate a natural light source within the scene, even if that source isn’t visible. For example, using a studio light to create the effect of moonlight shining through a window.
Role: The goal is to make the lighting feel realistic and justified by the story’s environment. It bridges the gap between purely artificial studio lighting and the naturalism of practicals. It guides the audience to believe the light is coming from a real source, enhancing the suspension of disbelief.
When to Use: Use motivated lighting in almost any narrative scene. If your characters are sitting by a campfire, your lighting should be warm, low, and flickering as if it’s coming from the fire. If a character opens a refrigerator, a cool light should spill onto their face. This technique is key to creating a believable and immersive cinematic world.

Available Light – Embracing the Real World
Available light, or ambient light, is any light that already exists in the location where you are shooting. This could be sunlight, moonlight, or the existing interior lights of a building.
Role: Using available light gives a scene a strong sense of realism and immediacy. It’s the cornerstone of documentary filmmaking and is often used in narrative films to achieve a natural, “unlit” look.
When to Use: Rely on available light when you are aiming for maximum authenticity, shooting a documentary, or working with a limited budget and equipment. Be aware that you will need to schedule your shoot around the light (e.g., shooting during the “golden hour”) and may need to use bounce cards or negative fill (blocking light) to control it effectively.

See Mores:
- How to Tag Someone on Instagram: The Complete Guide (2025)
- The Art of Storytelling: 5 Common Mistakes And How to Fix Them
- Google Case Study: How Google Ads Boosted Southeast Asian Businesses
Thanks for reading our guide to filmmaking lighting! We hope these definitions and tips help you on your next project. Follow us for more helpful tips and tricks to improve your filmmaking skills.