In the ever-evolving landscape of social media, relying solely on a Facebook Page for engagement is no longer enough. While Pages are excellent for broadcasting announcements, they often lack the two-way conversation that builds true loyalty. This is where Facebook Groups come in.
Many community managers and business owners ask: how to create a group from a facebook page? Doing so allows you to link your brand directly to a community, giving your Page administrative powers and immediate credibility. This guide will walk you through the exact steps to launch a linked group, how to create standalone groups, and how to manage the connection between the two.
Why Create a Group From Your Facebook Page?
Before we dive into the “how-to,” it is crucial to understand the “why.” Connecting a group to your official business Page offers distinct strategic advantages over starting a group with a personal profile.
Build a Deeper, More Engaged Community
A Page is often a “one-to-many” communication channel. A Group, however, is a “many-to-many” space. By creating a group linked to your Page, you foster a space where customers can talk to each other, not just you. This peer-to-peer interaction builds a sense of belonging that a standard Page feed cannot replicate.
Gain Direct Feedback and Customer Insights
Your group serves as a focus group that is available 24/7. Members are more likely to share honest feedback, pain points, and product wish lists in a closed community environment than they are in public comments on a Page post.
Increase Organic Reach for Your Page Content
Facebook’s algorithm heavily favors Group content because it generates discussion. When you post in your group as your Page, those posts are more likely to appear in members’ feeds compared to standard Page posts. This is a powerful hack to combat declining organic reach.
How to Create a Group From a Facebook Page (Step-by-Step Guide)
If you are wondering how to create a group from a facebook page using the current 2025 “New Page Experience” interface, follow these steps.
Step 1: Navigate to Your Facebook Page’s Admin View
First, ensure you are acting as your Page, not your personal profile.
-
Log in to Facebook.
-
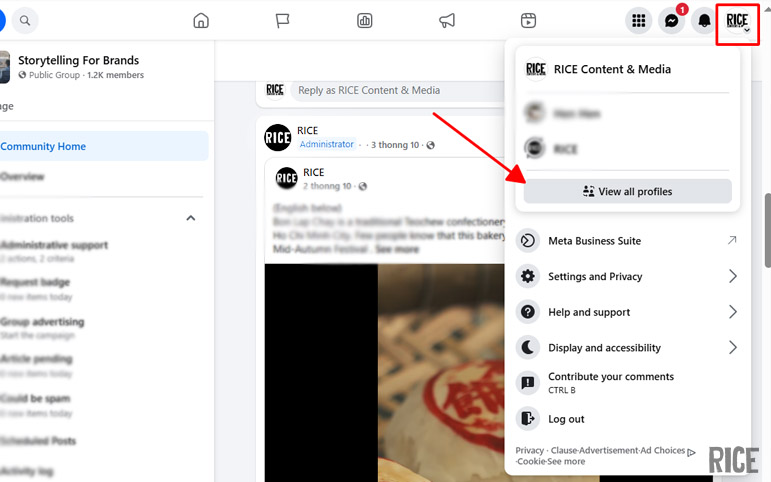
Click your profile picture in the top right corner.
-
Select “See all profiles” and switch to the Business Page you want to use.
-
Once switched, click on your Page’s name (top left) to go to your Page’s timeline.
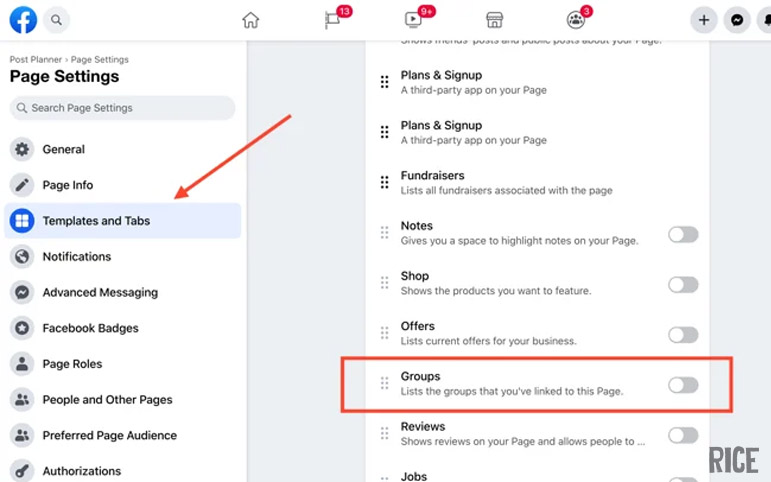
Step 2: Find and Select the ‘Groups’ Tab
On your Page’s main menu bar (under your cover photo), look for the “Groups” tab.
-
Note: If you do not see “Groups,” click on the “More” dropdown arrow. It is often hidden there.
-
If you still don’t see it, you may need to go to your Page Settings > Templates and Tabs to enable the Groups tab.
Step 3: Click ‘Create Linked Group’
Once you are in the Groups tab, you will see an option to “Link linked group” (for existing groups) or “Create linked group”. Click Create linked group. This ensures the group is automatically owned and managed by your Page.
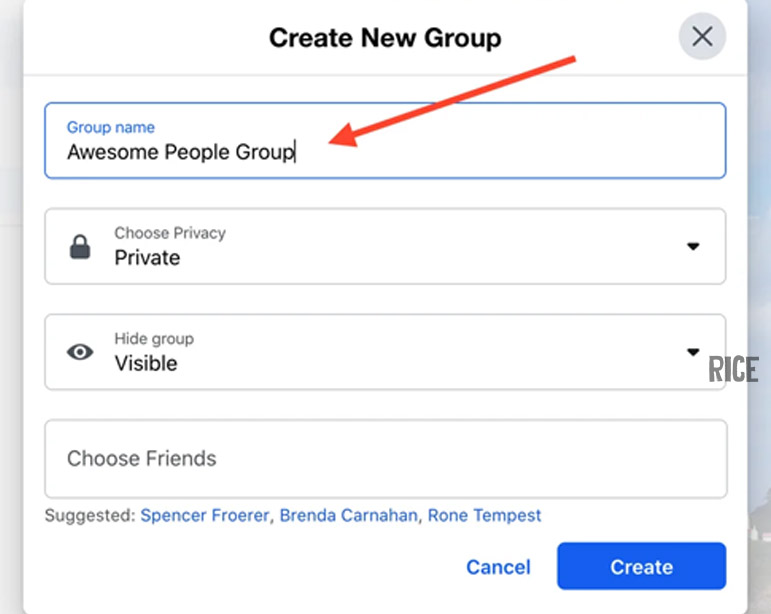
Step 4: Configure Your Group’s Settings (Name, Privacy, Visibility)
A pop-up window will appear asking for the essentials:
-
Group Name: Choose a name that includes your brand but also indicates the community aspect (e.g., “RICE Agency Community” or “RICE Content Insiders”).
-
Privacy: This is critical.
-
Public: Anyone can see who’s in the group and what they post.
-
Private: Only members can see who’s in the group and what they post. Most brand communities prefer Private to foster exclusivity.
-
-
Visibility: Keep it “Visible” so people can find it in search.
Step 5: Invite Page Followers and Start Building Your Community
Once you click “Create,” your group is live! The interface will prompt you to invite fans of your Page. Be selective at first—invite your most engaged customers or “super fans” to spark initial conversations before opening the floodgates.
How to Create a Standard Facebook Group (Not Linked to a Page)
Sometimes, you might want to start a group from your personal profile, or simply without the direct brand association initially.
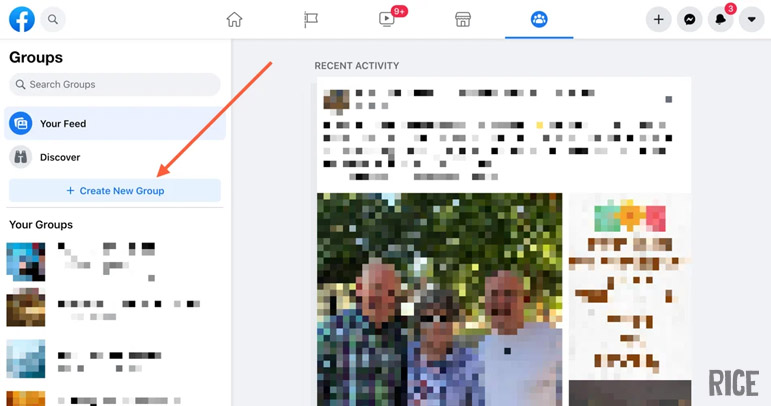
Creating a Standalone Group on Desktop
-
On your Home Feed, look at the left-hand sidebar and click Groups.
-
Click + Create New Group.
-
Fill in the Name, Privacy settings, and invite friends.
-
Click Create.
Creating a Standalone Group on the Mobile App (iPhone & Android)
-
Open the Facebook app and tap the Menu (three lines) icon.
-
Tap Groups.
-
Tap the + (Plus) icon at the top.
-
Select Create a Group.
-
Follow the on-screen prompts to name your group and select privacy settings.
How to Create a Facebook Page for an Existing Group
Technically, you cannot “convert” a group into a Page. However, if you have a successful group and now need a public-facing brand Page, you can create the Page separately and then link them.
-
Create your Page: Go to the Menu > Create > Page and set it up.
-
Link them: Go to your new Page’s settings (as described in the main guide above).
-
Navigate to the Groups tab.
-
Select “Link linked group”.
-
Select your existing group as the admin. Note: You must be an admin of both the Page and the Group to do this.
Essential First Steps: Setting Up Your New Group for Success
Knowing how to create a group from a facebook page is just the start. Now you must manage it.
How to Add Admins and Moderators to Your Facebook Group
Don’t do it alone. Go to your Group > Members. Find the person (or Page) you want to appoint, click the three dots next to their name, and select “Invite as Admin” or “Invite as Moderator.”
Establishing Clear Group Rules and Membership Questions
-
Rules: Go to “Group Rules” in the admin sidebar. Set expectations about spam, hate speech, and self-promotion.
-
Membership Questions: Use these to screen bots. Ask potential members why they want to join or if they agree to the rules.
How to Set Up Post Approval to Maintain Quality Content
To prevent spam, especially in new groups, turn on “Post Approval.” This means nothing goes live until an admin reviews it. This feature is found under Group Settings > Manage Discussion.
Frequently Asked Questions (FAQ)
What’s the difference between a Facebook Page and a Facebook Group?
A Page is like a public profile or storefront for your brand (official announcements, ads, public visibility). A Group is like a community center or a café (discussion, shared interests, community building).
How do I find my groups on Facebook?
On Desktop, click “Groups” in the left sidebar. On Mobile, tap the “Groups” icon in the navigation bar. You will see a “Your Groups” tab.
How do you search for new Facebook groups to join?
Type your interest (e.g., “Storytelling”) in the main Facebook search bar. Once the results load, filter by clicking the “Groups” tab to see communities related to that topic.
Can I link an existing group to my Facebook Page?
Yes. Switch to your Page profile, go to the “Groups” tab on your Page, and click “Link linked group.” You must be an admin of that group to link it.
How do I change my group’s privacy settings (Public vs. Private)?
Go to Group Settings > Privacy. Warning: You can change a group from Public to Private, but you cannot change a Private group back to Public to protect the privacy of the members’ past posts.
See more: