To save time and enhance your Instagram strategy, scheduling posts is an essential skill. Consistency is vital for growth, and as of 2025, Instagram and Meta now offer powerful, built-in tools to schedule posts, Reels, and Stories in advance, eliminating the need for real-time manual posting. This guide provides a simple walkthrough on how to schedule content from a computer, Android, or iPhone. By planning ahead, you can post at optimal times, save time, and maintain a consistent brand presence.
Why should you schedule Instagram posts ahead of time?
Scheduling your content in advance is a strategic move that offers several key benefits:
- Saves Time and Reduces Stress: Instead of the daily pressure to create content, you can “batch” produce everything for the week or month in a single session. This frees you from the daily grind.
- Ensures Consistency: Maintaining a regular posting schedule is crucial for keeping your audience engaged and is favored by the Instagram algorithm. Scheduling ensures you never miss a post.
- Posts During “Golden Hours”: You can schedule content to be published exactly when your followers are most active, even if it’s outside of your own working hours. This maximizes your reach and engagement.
- Elevates Content Quality: When you plan ahead, you have more time to think creatively and refine your visuals and captions. Your content becomes more professional, strategic, and better aligned with your brand’s message.
Getting Started: The Professional Account Requirement
Before diving into the “how-to,” it’s essential to understand that the ability to schedule posts directly on Instagram is available only for Professional accounts (Business or Creator). If you have a Personal account, you’ll need to make the switch. It’s a simple, free process that unlocks a suite of tools, including analytics and scheduling.
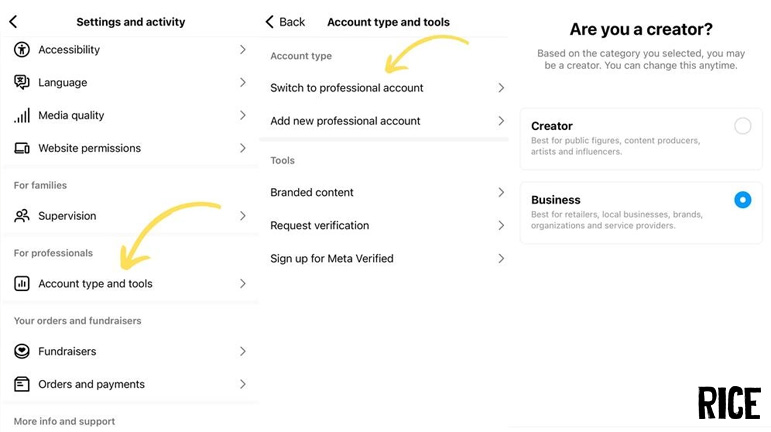
To switch to a Professional Account:
- Go to your Instagram profile and tap the three horizontal lines in the top-right corner.
- Tap on “Settings and privacy.”
- Scroll down and select “Account type and tools.”
- Tap “Switch to professional account” and follow the on-screen prompts.
How to Post on Instagram on the Computer
- Step 1: Navigate to Meta Business Suite: Open your web browser and go to Meta Business. Log in to the Facebook account associated with your Instagram Business or Creator account.
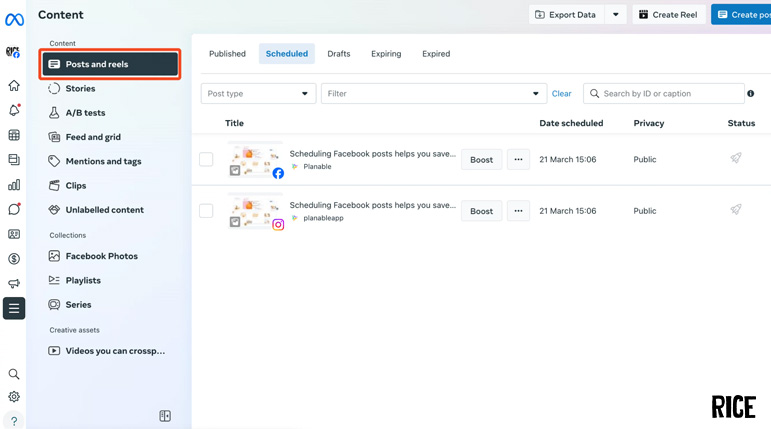
- Step 2: Access the Content Planner: In the left-hand menu, click on “Planner.” This will open a calendar view of your past and future scheduled posts across Facebook and Instagram.
- Step 3: Create Your Post: In the top right of the Planner, click the “Create” button. A new window will pop up.
- Step 4: Select Your Placement: At the top of the creation window, under “Post to,” make sure your Instagram account is checked. You can also choose to post to your Facebook Page simultaneously.
-
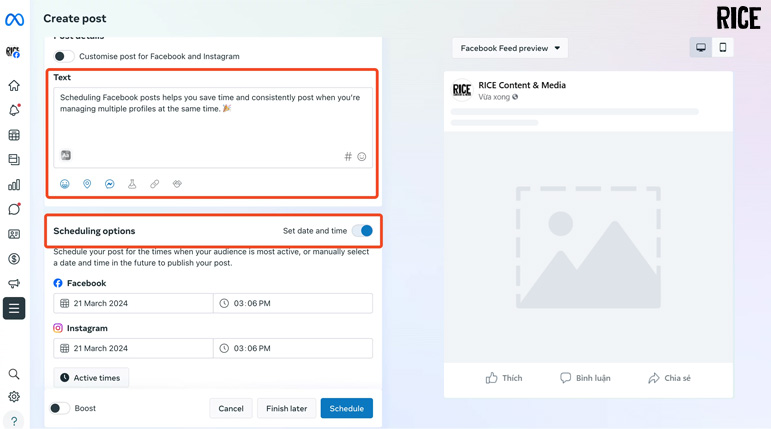
Step 5: Compose Your Content
- Add Media: Click “Add Photo” or “Add Video” to upload your content from your computer. You can upload multiple images for a carousel post.
- Write Your Caption: Craft your caption in the “Text” box. You can include mentions (@username) and up to 30 hashtags.
- Add Location (Optional): Click the location pin icon to add a geographical tag to your post.
-
Step 6: Schedule Your Post
- Instead of clicking “Publish,” look for the “Schedule” option at the bottom.
- Select your desired date and time for the post to go live. Meta Business Suite will even suggest optimal times based on when your followers were most active in the last week.
- Once you’ve set the time, click the “Schedule” button.
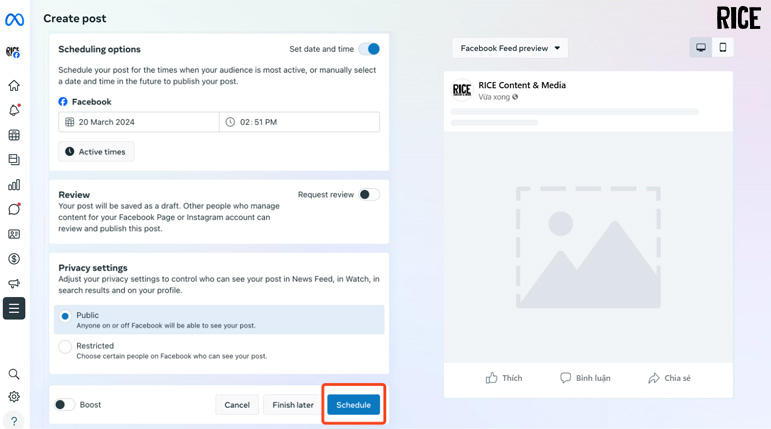
Your post is now scheduled and will appear in your content planner.
Tips for Desktop Scheduling:
- Schedule More Than Just Posts: Meta Business Suite is the only native way to schedule Instagram Stories and Reels in advance. The process is similar to scheduling a post.
- Bulk Upload: Save time by uploading all your media for the week or month at once into the File Manager within Business Suite.
- Utilize the Planner: The calendar view in the Planner is excellent for visualizing your content strategy and ensuring a consistent flow of posts.
- A/B Testing: You can create different versions of a post and schedule them for different times to see what performs best.
How to Schedule a Post on Instagram on Phone (Android & Iphone)
Step 1: Start a New Post: Open the Instagram app and tap the “+” icon at the bottom of the screen. Select “Post” and choose the photo or video you want to schedule from your gallery. Tap “Next.”
Step 2: Edit Your Content: Apply any desired filters or edits, then tap “Next” again.
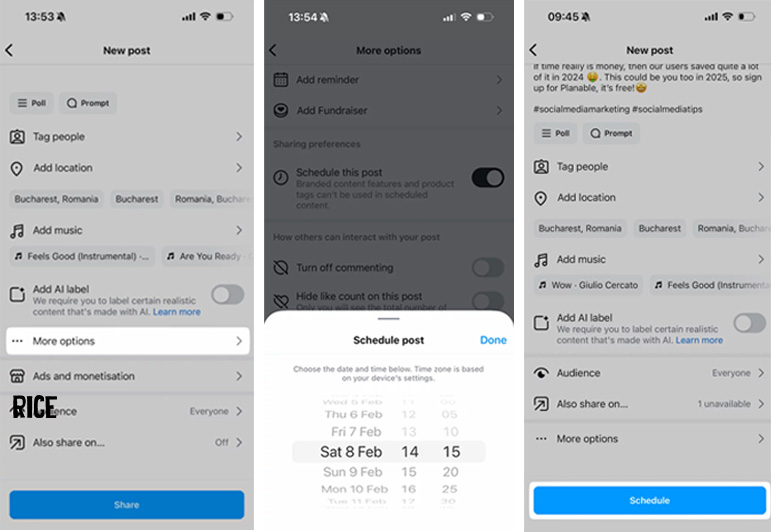
Step 3: Access Advanced Settings: On the final screen where you write your caption, add a location, and tag people, scroll down and tap on “Advanced settings.”
Step 4: Schedule the Post:
- Toggle on the switch next to “Schedule this post.”
- A calendar and time selector will appear. Choose the date and time you want your post to be published. You can schedule content up to 75 days in advance.
Tap “Done.”
Step 5: Finalize the Schedule: Tap the back arrow to return to the caption screen. You will now see that the “Share” button has changed to a “Schedule” button. Tap “Schedule” to confirm.
Tips for phone Scheduling:
- Drafts Still Work: If you’re not ready to schedule, you can still save your post as a draft by tapping the back arrow twice and selecting “Save Draft.”
- Check Your Time Zone: The scheduling feature uses your device’s current time zone. Be mindful of this if you are traveling or targeting an audience in a different region.
- Limit of 25 Posts: Natively within the app, you can schedule up to 25 posts per day.
See more:
- The Three-Act Structure: Your Blueprint for Compelling Storytelling
- The Art of Storytelling: 5 Common Mistakes And How to Fix Them
- Google Case Study: How Google Ads Boosted Southeast Asian Businesses
Embrace scheduling to transform your Instagram from a daily task into a powerful, automated engine for growth.